
Hello readers, in this article, I will explain how to create an API and deploy it in the cloud for free. I will use Flask (a web framework of Python) to create the APIs and host them on the Oracle Cloud.
Prerequisites
- Python Programming basics
- Linux commands basics
- Oracle cloud free tier account or any cloud platform account with free trial(GCP, AWS etc).
Overview
1. Introduction
API stands for Application Programming Interface. APIs are the means to connect between various apps or programs. For example, we can connect an e-commerce app like Amazon with a payment app like Google Pay or Phonepe to make payments for purchasing items. Here Amazon and Payment apps communicate using APIs. APIs can be multiple types including REST APIs, GraphQL APIs etc. To simplify the process, let’s create a simple REST API in Python.
REST APIs are accessible through HTTP. Using REST APIs, we can perform CRUD operations by calling a website URL. When we call the URL, the particular software performs backend processes like fetching data from the database, performing calculations and returning data in the form of JSON.
JSON format is the common language used by APIs for faster communication. For example, two applications communicate through API calls using JSON language. You can refer here for more details.
2. Install the required dependencies on the VM
If you have a cloud account, go to your cloud platform and start a Virtual Machine(VM). If you don’t have an account, you can get an Oracle Cloud account from here and start a VM for free. After starting the instance(VM), you can connect to the instance using the ssh command below:
ssh -i your-private-key-path user@your-ip
In the above command, replace your-private-key-path with the path where you stored the private key, the user generally would be Ubuntu in the case of Oracle and your-ip is the public IP with which you connect to the VM.
After connecting to the VM, update the package lists with the below command:
sudo apt update && sudo apt upgrade -y
Install flask using pip as below:
pip3 install flask
We are done with installing dependencies in our VM. Let’s create our API.
3. Create a Flask API
Create a new directory for our flask API and name it flask-api:
mkdir flask-api
Switch to our new directory:
cd flask-api
Create a Python file named app.py and write the below code in it using nano or vi editor:
from flask import Flask, jsonify

app = Flask(__name__)

@app.route('/message')
def home():
    return jsonify({"message": "Hello, You created an API!"})

if __name__ == '__main__':
    app.run(host='0.0.0.0', port=5000)
In the above code, port=5000 indicates that the Flask app is running at your-ip:5000. The line host=’0.0.0.0′ makes the API accessible from any IP apart from localhost. @app.route(‘/message’) routes our app to be called at your-ip:5000/message.
4. Test the API(Output)
Run the below command to start the Flask web server:
python3 app.py
You can see the output in the terminal as shown below:

Note: You see a warning because Flask’s web server is for development purposes only as it lacks security and scalability. We should use a production-ready WSGI server like Gunicorn to run the API in a production environment.
To test the output, open your local web browser and visit your-ip:5000/message. For example, if your VM’s public IP is 144.24.142.183, you can visit http://144.24.142.183:5000/message to see the output. Sample output is shown below:
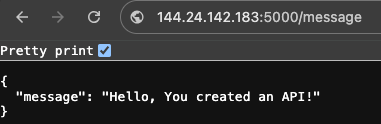
Congratulations on creating your own API and successfully hosting it in the cloud for free. Once you practise developing APIs, You can create complex APIs based on authentication, e-commerce etc.
Leave a Reply